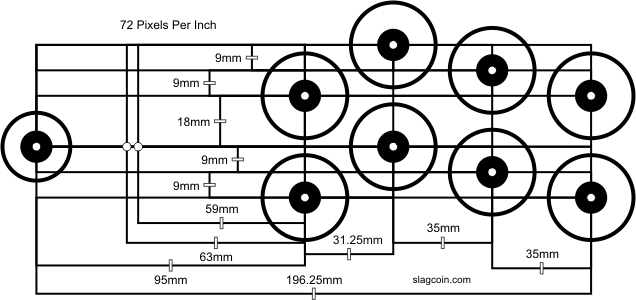
Before getting to the labeling of the buttons, I’ll talk a bit about the layout that I chose. I found this extremely helpful website: https://www.slagcoin.com/joystick/layout.html
The first thing to decide was how many buttons I would use for each player (I had decided that this would be a two-player arcade machine). Out of the consoles that I wanted to emulate, the one with the most buttons on the controller was PS1. There are the four action buttons (circle, X, square, and triangle), start and select, and two shoulder or trigger buttons on each side, for a total of 10 buttons. I decided to use an 8-button layout, because start and select could be placed just about anywhere, since they are not typically used during gameplay. I decided to go with this layout:
My first idea about having labels for the buttons on the arcade machine was to create thin overlays with holes in them. So you would have this stack of overlays and find the one that corresponded with the game that you were playing, and place that on the controls. I quickly abandoned this approach for several reasons. The biggest reason was that the idea of looking through a stack of overlays every time you want to play a game is so unappealing that it would probably never actually happen.
I thought that it would be really cool if the control panel could be changed electronically, but I didn’t think I could find an LCD that was approximately 12″x30″ and that you could drill holes in. Then I thought that maybe I could find individual LCDs that were small enough that I could put one next to each button, and change the display based on the game being played. I looked for the smallest LCD I could find, and I found this one:

https://learn.adafruit.com/adafruit-mini-tft-0-dot-96-inch-180×60-breakout/overview
This was pretty exciting. I could place displays below the bottom row of buttons and above the top row. They were small enough that they would fit without interfering with each other. They were a little pricey, but I could order them one at a time and eventually have all that I need.
Since I had already found the tutorial on lighting only the in-use buttons, I figured I could use some of that information to load displays when games are loaded.
